Vim实用技巧进阶(第8章:文档导航基础) - Practical.Vim.2nd.Edition Tip 47~55
Practical.Vim.2nd.Edition 实用技巧进阶: 第8章 - 文档导航基础
第8章 文档导航基础
Navigate Inside Files with Motions
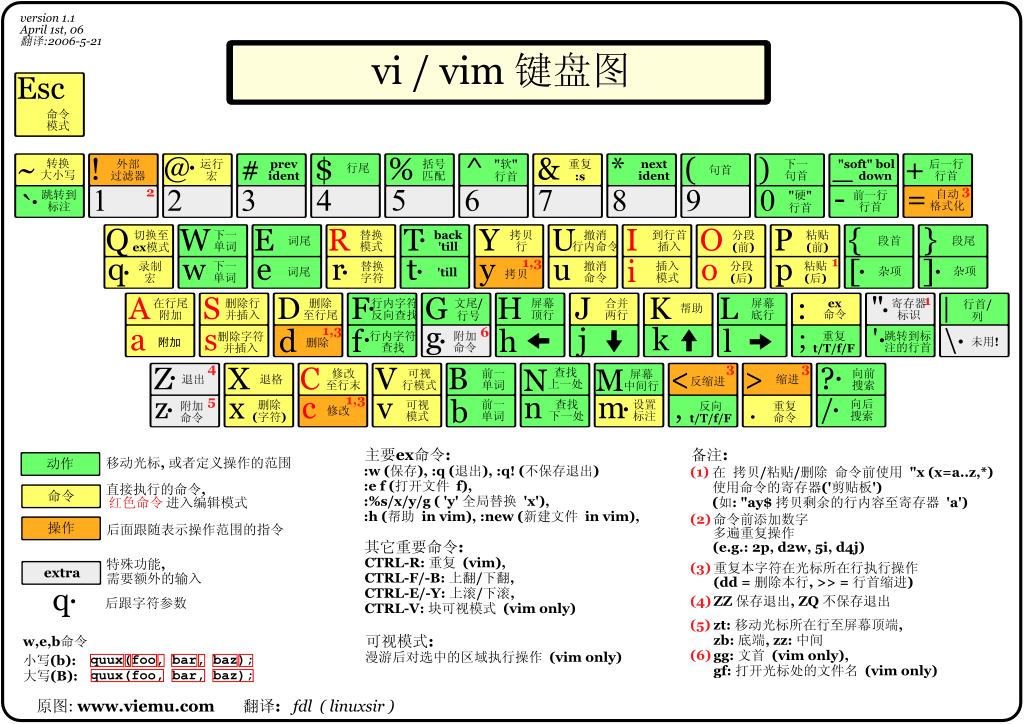
Tip 47 手指按键
Keep Your Fingers on the Home Row
双手在键盘上的姿势:
- a s d f - 左手4指位置
- j k l ; - 右手4指位置
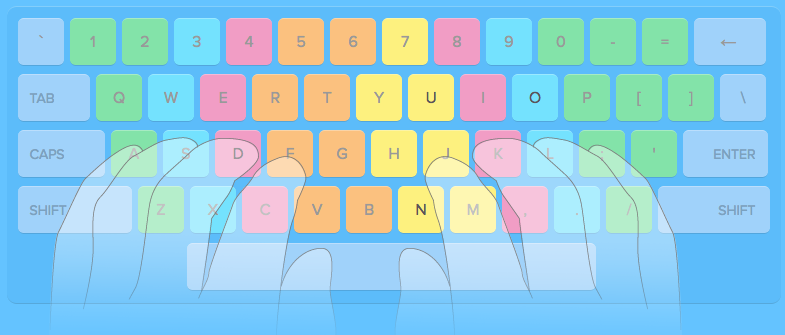
基础 上/下/左/右 移动:
| Command | Move Cursor |
|---|---|
h |
左移 |
l |
右移 |
j |
下移 |
k |
上移 |
禁用4个方向键来加强练习: ~/.vimrc
noremap <Up> <Nop>
noremap <Down> <Nop>
noremap <Left> <Nop>
noremap <Right> <Nop>
Tip 48 区别真实行和显示行
Distinguish Between Real Lines and Display Lines
真实行- 通常情况下的一行文本 (行末为换行符)显示行- 在 vim 编辑器 里看到的文本行, 一行文本显示不了会自动换行显示
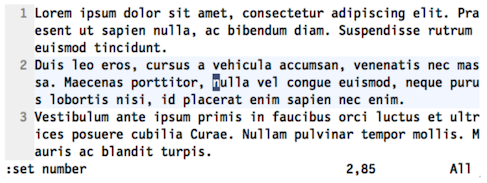
在开启行号显示(:set number)之后就明显了, 上图的真实行数为: 3, 显示行数为: 9
了解2着的区别很重要, 因为在光标移动上面的方式会不同:
j和k- 按 真实行 进行 往下/往上 移动gk和gk- 按 显示行 进行 往下/往上 移动
如上图所示, 例如我们想把 光标 从 nulla 移动到 vehicula, 那么应该按 gk, 而 k 是按 真实行 进行移动, 会移动到 ac 的位置
| 命令 | 光标移动 |
|---|---|
j |
真实行 下移 |
gj |
显示行 下移 |
k |
真实行 上移 |
gk |
显示行 上移 |
0 |
真实行 行首 |
g0 |
显示行 行首 |
^ |
真实行 行首非空白字符 |
g^ |
显示行 行首非空白字符 |
$ |
真实行 行尾 |
g$ |
显示行 行尾 |
大多数的 文本编辑器 的光标移动都是按照 显示行 来的
所以如果不习惯, 可以重新设置按键映射:
nnoremap k gk
nnoremap gk k
nnoremap j gj
nnoremap gj j
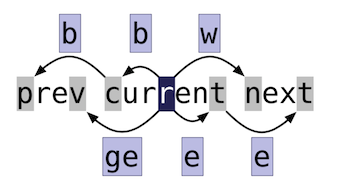
Tip 49 按词移动
Move Word-Wise
| 命令 | 光标移动 |
|---|---|
w |
移动到 下一个词 的第一个字母处 |
b |
移动到 当前/上一个词 的第一个字母处 |
e |
移动到 当前/下一个词 的最后一个字母处 |
ge |
移动到 上一个词 的最后一个字母处 |
例如在一次单词后面追加字母:
| Keystrokes | Buffer Contents |
|---|---|
| {start} | Go fast. |
eaer<Esc> |
Go faster. |
理解 word 和 WORD:
A word consists of a sequence of letters, digits and underscores, or a sequence of other non-blank characters, separated with white space (spaces, tabs,
<EOL>). This can be changed with the ‘iskeyword’ option. An empty line is also considered to be a word.
A WORD consists of a sequence of non-blank characters, separated with white space. An empty line is also considered to be a WORD.
word: 由 字母+数字+下划线 组成; 空行也被认为是一个word; 光标移动如:wbegeWORD: 由 一串非空白字符 的字符串组成; 空行也被认作一个WORD; 光标移动如:WBEgE空白字符- 空格, 制表符(Tab), 换行
移动效果对比:
| Keystrokes | Buffer Contents |
|---|---|
| {start} | e.g. we’re going too slow |
wwww |
e.g. we’re going too slow |
www |
e.g. we’re going too slow |
| Keystrokes | Buffer Contents |
|---|---|
| {start} | e.g. we’re going too slow |
W |
e.g. we’re going too slow |
W |
e.g. we’re going too slow |
替换效果对比:
| Keystrokes | Buffer Contents |
|---|---|
| {start} | e.g. we’re going too slow |
cwyou<Esc> |
e.g. you‘re going too slow |
| Keystrokes | Buffer Contents |
|---|---|
| {start} | e.g. we’re going too slow |
cWit’s<Esc> |
e.g. it’s going too slow |
WORD 比 word 范围更大, 大块 移动/删除/替换 等操作会更加方便
手册:
- :h word-motions
- :h word
- :h WORD
Tip 50 按字符查找
Find by Character
语法 f{char}
vim 里最快的移动技能之一; 行内按字符往后搜索, 如果匹配到, 那么光标直接定位到匹配的字符上, 没匹配就保持原状
| Keystrokes | Buffer Contents |
|---|---|
| {start} | Find the first occurrence of {char} and move to it. |
fx |
Find the first occurrence of {char} and move to it. |
fo |
Find the first occurrence of {char} and move to it. |
fx 没有匹配到 x 字符, 所以光标没有移动; fo 匹配到第一个出现的 o, 所以光标直接定位到了上面
| Keystrokes | Buffer Contents |
|---|---|
| {start} | Find the first occurrence of {char} and move to it. |
fc |
Find the first occurrence of {char} and move to it. |
; |
Find the first occurrence of {char} and move to it. |
; |
Find the first occurrence of {char} and move to it. |
; |
Find the first occurrence of {char} and move to it. |
这里实际上我们是想定位到 char 这里的, 因为 c 字符再前面出现过好几次, 所以, 我们使用 ; 重复上一次的 f{char} 操作, 最后按了3次 ; 才到达目标位置
| Keystrokes | Buffer Contents |
|---|---|
| {start} | Find the first occurrence of {char} and move to it. |
fo |
Find the first occurrence of {char} and move to it. |
;; |
Find the first occurrence of {char} and move to it. |
, |
Find the first occurrence of {char} and move to it. |
这里的 , 是反向查找 ; 相反的操作
字符查找可以包含/排除目标:
| Command | Effect |
f{char} |
向后搜索字符 {char} |
F{char} |
向前搜索字符 {char} |
t{char} |
向后搜索字符 {char}, 光标定位到匹配字符前 |
T{char} |
向前搜索字符 {char}, 光标定位到匹配字符后 |
; |
重复最后一次的搜索命令 (上面4个命令) |
, |
反向最后一次的搜索命令 |
t{char} 和 T{char} 在处理 删除/修改 方便更为方便些
| Keystrokes | Buffer Contents |
|---|---|
| {start} | I‘ve been expecting you, Mister Bond. |
f, |
I’ve been expecting you, Mister Bond. |
dt. |
I’ve been expecting you. |
最后的 dt. 和 dfd 虽然是等价的, 但是前者跟清晰; 试想假如再多几个单词呢?
总之: 正常模式下推荐用 f 和 F, 操作模式下推荐 t 和 T
一般来讲, 我们用1步能做到的就不要用2步, 能重复的就能一键搞定; 一个字, 就是: 快
尽量使用出现频率很少的字符(比如大小的首字母, 标点等)来快速的移动
手册:
- :h f
- :h ;
- :h ,
Tip 51 搜索导航
Search to Navigate
语法 /{chars} 或 /{patterns}
字符搜索命令(f{char}, t{char}等)很快, 按键也少, 不过也有挺多限制的: 只能查找一个字符, 只能在行内搜索; 而搜索命令就能不足这些缺点
比如我们想把光标定位到: takes
search for your target
it only takes a moment
to get where you want
| Keystrokes | Buffer Contents |
|---|---|
| {start} | search for your target it only takes a moment to get where you want |
/ta<CR> |
search for your it only takes a moment to get where you want |
/tak<CR> |
search for your target it only to get where you want |
- 按下
/启用搜索命令 - 按下
ta2个字符后, 可以看到有2处匹配的结果,<CR>回车定位到了第一次匹配的地方; 可以按n跳转到下一个匹配地方, 也可以按N反向跳转 /tak匹配到了唯一的结果,<CR>回车定位到匹配的地方
加入如下配置会非常实用: ~/.vimrc
" 搜索: 高亮 增量显示部分匹配 忽略大小写
set hlsearch
set incsearch
set ignorecase
配合搜索的操作:
| Keystrokes | Buffer Contents |
|---|---|
v |
This phrase takes time buteventually gets to the point. |
/ge<CR> |
This phrase takes time buteventually ets to the point. |
h |
This phrase takes time buteventually gets to the point. |
d |
This phrase gets to the point. |
v切换到可视化模式/ge<CR>搜索匹配ge, 按回车后光标定位到 gets 的首字母处, 由于是可视化模式, 所以把2次光标中间的位置都选中了h光标左移一个字符, 到了空格位置d删除可视化选中的字符串
更快速的方法:
| Keystrokes | Buffer Contents |
|---|---|
| {start} | This phrase takes time buteventually gets to the point. |
d/ge<CR> |
This phrase gets to the point. |
这里我们使用 /ge<CR> 搜索结果给 d{motion} 命令来进行删除
这里的搜索命令是一个 不包含 的motion, 意味着即使搜索完成, 光标定位到了 gets 的首字母上面, 删除的时候, 字符 g 是被排除在外的
手册:
- :h exclusive
Tip 52 精准的选择文本对象
Trace Your Selection with Precision Text Objects
文本对象可以方便的和括号, 引号, xml标签等实现交互
var tpl = [
  '<a href="{url}">{title}</a>'
]
这段代码包含了配对的中括号, 大括号, 大于小于符号, THML标签, 单引号, 双引号等字符
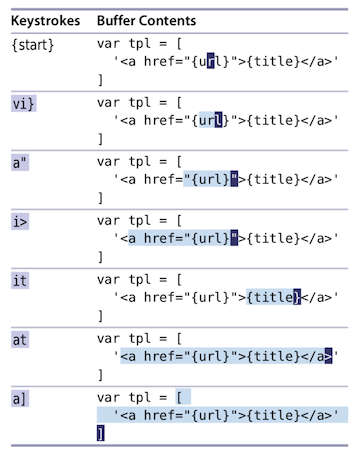
上面的操作都是在可视化模式下, 对不同文本对象的选取, 是不是方便?
| 文本对象 | 匹配区域 | 文本对象 | 匹配区域 |
|---|---|---|---|
a) or ab |
括号 | i) or ib |
括号的内容 |
a} or aB |
大括号 | i} or iB |
大括号的内容 |
a] |
中括号 | i] |
中括号的内容 |
a> |
尖括号 | i> |
尖括号的内容 |
a' |
单引号 | i' |
单引号的内容 |
a" |
双引号 | i" |
双引号的内容 |
a` |
反引号 | i` |
反引号的内容 |
at |
标签 | it |
标签的内容 |
使用文本对象镜像操作:
在可视化模式中, 文本对象可以完美的展示出来, 而真正强大的却是修改文档的时候, 比如: d{motion} c{motion} y{motion}
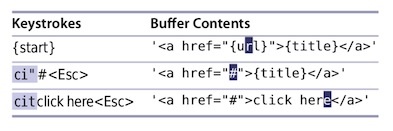
手册:
- :h text-objects - 查看更多的文本对象
- :h c
Tip 53 外围删除或内部修改
Delete Around, or Change Inside
文本对象 通常成对出现: 一个在对象内部(inner)起作用, 另一个在周围(around)起作用
| 文本对象 | 匹配区域 | 文本对象 | 匹配区域 |
|---|---|---|---|
iw |
一个词 word | aw |
一个词 word 含空格 |
iW |
一个词 WORD | aW |
一个词 WORD 含空格 |
is |
一句话 | as |
一句话 含空格 |
ip |
一段话 | ap |
一段话 含空行 |
两个 aw 和 iw 的示例:
| Keystrokes | Buffer Contents |
|---|---|
| {start} | Improve your writing by deleting excellent adjectives. |
daw |
Improve your writing by deleting adjectives. |
| Keystrokes | Buffer Contents |
|---|---|
| {start} | Improve your writing by deleting excellent adjectives. |
ciwmost<Esc> |
Improve your writing by deleting most adjectives. |
删除的时候把 word 及后面的空格一起删除; 而修改的时候则只改 word, 后面的空格保留
一般来讲:
d{motion}更适合于:awasap场景c{motion}更适合于:iwisip场景
Tip 54 位置标记和返回标记
Mark Your Place and Snap Back to It
vim 标记可以使我们在文档内快速的进行跳转, 我们可以手动设置标记, vim 也会自动记录我们感兴趣的位置
标记语法 m[a-zA-Z]
[a-z]小写字母 仅在当前缓冲区可访问[A-Z]大写字母 全局生效, 多个缓冲区可访问
跳转语法
`{mark}- 跳转到标记为{mark}的精确位置'{mark}- 跳转到标记为{mark}行的行首非空白字符处
vim 自动标记的位置:
| Keystrokes | Buffer Contents |
|---|---|
`` |
当前文件中最后一次跳转前的位置 |
`. |
最后修改的位置 |
`^ |
最后插入的位置 |
`[ |
最后一次修改/拷贝的起始位置 |
`] |
最后一次修改/拷贝的结束位置 |
`< |
最后一次可视化块的起始位置 |
`> |
最后一次可视化块的结束位置 |
手册:
- :h m
- :h mark-motions
Tip 55 在匹配括号之间跳转
Jump Between Matching Parentheses
% 可以再匹配的括号间进行跳转; 比如: () {} [] <>
| Keystrokes | Buffer Contents |
|---|---|
| {start} | console.log([{‘a’:1},{‘b’:2}]) |
% |
console.log([{‘a’:1},{‘b’:2}]) |
h |
console.log([{‘a’:1},{‘b’:2}]) |
% |
console.log([{‘a’:1},{‘b’:2}]) |
l |
console.log([{‘a’:1},{‘b’:2}]) |
% |
console.log([{‘a’:1},{‘b’:2}]) |
嗯, 代码里面用起来就比较舒服了
cities = %w{London Berlin New\ York}
这里我们想把 %w{London Berlin New\ York} 改成普通的列表定义: ["London", "Berlin", "New York"]
| Keystrokes | Buffer Contents |
|---|---|
| {start} | cities = %w{London Berlin New\ York} |
dt{ |
cities = {London Berlin New\ York} |
% |
cities = {London Berlin New\ York} |
r] |
cities = {London Berlin New\ York] |
`` |
cities = {London Berlin New\ York] |
r[ |
cities = [London Berlin New\ York] |
本示例中 <C-o> 和上面的 `` 起一样的效果 (Tip 56)
surround.vim 插件可用帮我们更加轻松的完成此项任务
在匹配关键词之间跳转:
Vim 自带了一个叫 matchit 的插件, 此插件对 % 进行了增强; 插件启用时, % 可以在 HTML 开启标签和关闭标签之间跳转, 脚本语言也支持的
启用 matchit 插件: ~/.vimrc
set nocompatible
filetype plugin on
runtime macros/matchit.vim
安装 surround.vim 插件之后, 把选中的文本用双引号围绕就很好操作了:
| Keystrokes | Buffer Contents |
|---|---|
| {start} | cities = [“London”, “Berlin”, New York] |
vee |
cities = [“London”, “Berlin”, New Yor] |
S" |
cities = [“London”, “Berlin”, "New York”] |
S"- (Surround with) 表示把选中的文本用双引号围绕cs}]- (Change surrounding) 可以把{London}改为[London]ds}- (Delete surrounding) 可以把{London}改为London
手册:
- :h %
- :h matchit-install
相关:
blog comments powered by Disqus